ok i’m no expert and to be quite honest i don’t even know what i’m doing most of the time BUT i’ll give u some tips based on how i draw + what i know from being a chubby person myself lol
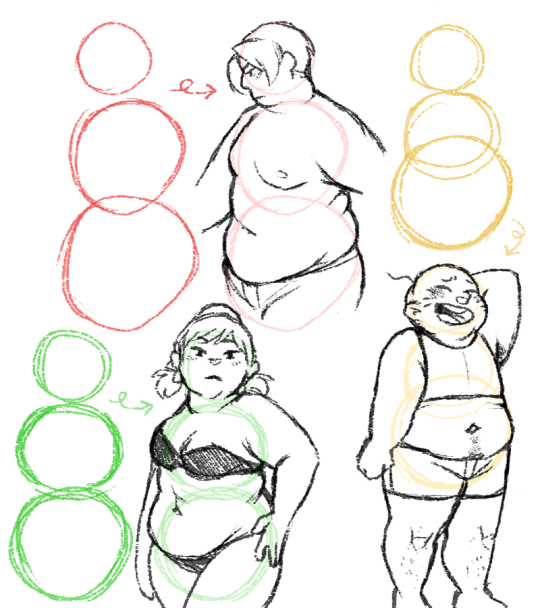
first of all: think circles
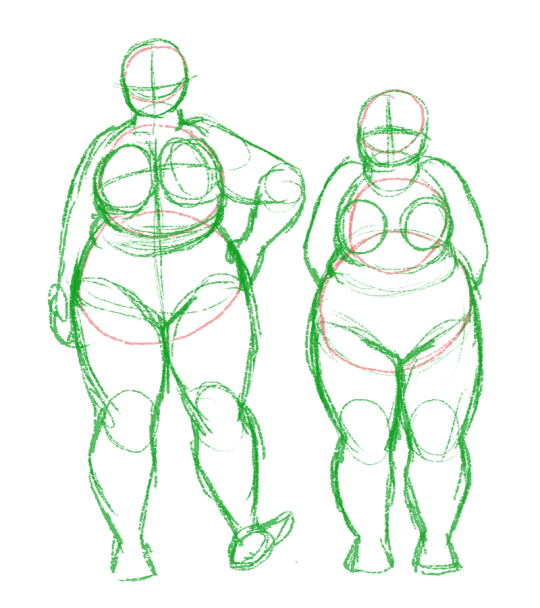
snowmen!!! the first one’s body is made up of 2 circles of the same size, indicating the chest and hips are gonna be the about the same size (an hourglass shape), while the one on the right has a smaller top and is gonna be a pear shape!!
now let’s sketch over these snowmen, keeping circles and soft shapes in mind the whole time!
and finally….
note the tummy rolls where the circles overlap!! fat will squish and bend all over the place, so if a person is stretching there won’t be tummy rolls, but when relaxing, the fat will roll up.
important to keep in mind: fat distribution varies a lot from person to person!! i reccommend googling nude fat people (not just plus models!!!) and studying how the fat is stored on people’s bodies and how it will move with the person!! (and if you happen to be a chubby person yourself, don’t be afraid to use a mirror!!)
fat people come in all shapes and sizes, so i couldn’t even BEGIN to try and draw every body shape there is!! so again, google is your friend. that said, here’s a few more snowmen turning into people:
the body isn’t the only thing to keep in mind, of course; the face is also super important!! a nice trick is to simply put less definition on the jawline; fat covers up bone structure!!
i just erased some lines and BOOM!! also, make the face rounder and fuller for those cute pinchable chubby cheeks!!
and of course, don’t forget about double chins!!
a lot of fat is stored around the neck so not only will you get double chins, but the back of the neck will also be chubby!! that’s a good thing to keep in mind when drawing short-haired or bald chubby people
another important detail: the arms!
fat mostly tends to gather in the upper arms but depending on the person the rest of the arm can also be noticeably chubby (for example, there will be less bone definiton around the wrist.) take note of the armpit area, where you’ll get folds!!
now for something i think is super important!!! stretchmarks!!
honestly, i think it’s so sad that there’s so much stigma around stretchmarks, because i think they’re wonderful!! they look like lightning bolts, or tiger stripes!!!
that said, stretchmarks are scars, so fresh marks will be reddish while older marks will fade and usually become a lighter tone than your skintone. they’ll appear wherever the skin stretches when you grow or gain weight, but here are the most common places to see them:
the upper arms
the chest/breasts
the underside of the tummy
the waist
the thighs (both inside and outside)
the butt
ok, i think that’s about it for tips i have to offer!! i’ll just repeat the most important tip of them all: don’t be afraid to google references!! references are your friend, it’s not cheating, every artist uses them and you will learn SO MUCH from them, trust me!!! and of course, practice practice PRACTICE!! figuring out how to draw different body types in your own style, especially if you’re used to drawing slimmer/skinnier people (and let’s face it, a lot of us started out drawing just one body type) takes time and practice, so just keep drawing!! 😀
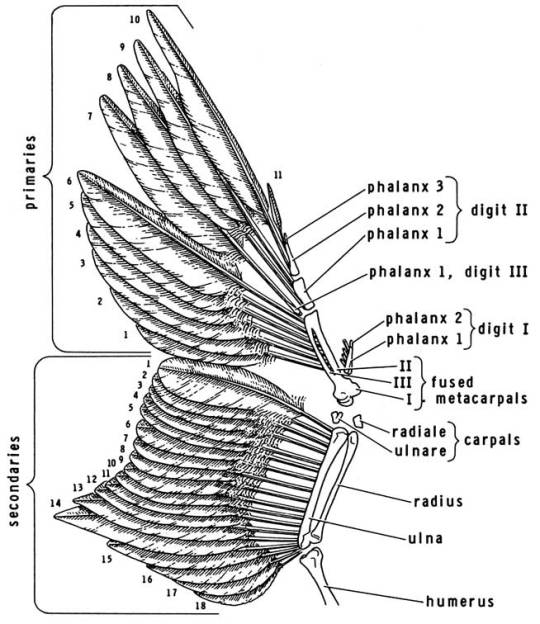
Wing anatomy reference photos (note: artists!) This is a white Mandarin Duck during his molt. He has shed his flight feathers (primary and secondary feathers) and is growing them back in. They are still pinfeathers. If you are not familiar with pinfeathers, they are the stick-like stage of feathers where blood is still nourishing the growth of the feather proteins (like the beds of your fingernails, sorta!). Photos of this stage can be helpful to people trying to learn wing anatomy because the origins of these major flight feathers is clear on the wing structure. Here is a diagram of their attachment points to the bird’s skeleton*:
Hopefully these photos are helpful to those learning, especially given the challenging angle/pose that these photos represent!
*Note that some seabirds are really weird and might confuse you here because what even are albatrosses
I want to teach you all how I make my fabric poppets, and how you can make your own too. Here is my post detailing all of what I do to make my adorable plush fabric poppets.
I also sell them if making them yourself is too much fuss for any reason. Here are details.
——Supplies——
– Fabric of your choice- My fabric of choice is fleece. The fabric should be a color you can match with your intent, personality, etc.
– Person-shaped pattern to trace- You can use a gingerbread man cookie cutter to make your paper pattern, free hand, or if you like you can use mine which I will gladly sell you a copy of- message me for details.
– Needle and thread- You can use different thread colors for different intentions.
– Stuffing and any extras- herbs, objects, etc.
– A marker of a similar but darker color than the fabric
– Scissors
-Step 1-
Lay out your fabric. Lay down the poppet pattern on the fabric. I prefer to weight them down with rocks so they don’t shift. (You can of course choose rocks that match your intent.)
-Step 1.5-
I then trace the patter with a maker that is of a similar color to the fabric, but off enough that I can see it. Don’t worry about being super clean with your lines because they will be hidden in the inside seams.
-Step 2-
Next, to sew the pieces together. Place them together so that the side with the marker line faces out.
Then, grab your needle and thread. Thread your needle.
Be sure to have a piece of thread to work with that is about as long as your arm. This should be enough for the whole poppet, but make sure to have more on hand just in case.
-Step 3-
Start your sewing in the place where the opening will end later. I typically choose the “armpit” of the poppet because then the opening gives me great access to all of its insides for later.
I use a kind of slip stitch for sewing. Really any stitch will do, but I will show you mine. I put the needle all the way through both pieces of fabric to make a loop, and before tightening I stick the needle through the loop, then tighten. This makes a kind of knot that is durable and nice looking. Here’s a picture:
Aside- Why I hand sew- I find the process of hand sewing to be not only relaxing but also more magical. I can focus on my intentions while I sew, and with each stitch I’m fastening my energy into it. This is by no means the only way you can sew them together, but it is my personal preferred way.
Continue sewing around to join the two pieces of fabric. **Remember to leave a 1.5in opening! Also leave your thread attached!** This is the only way to turn it inside out and hide the seams.
– Step 4-
Turn it inside-out. Reach inside and grab the top of the poppet’s head and pull it through the hole like shown. You may need to poke around a bit to make sure everything is fully turned right-side-out.
-Step 5- Once right-side-out, your poppet is ready for stuffing. Start with the appendages first, that way you can make sure they are well-fluffed. After that, if you want add in balls of stuffing in the places of major organs to make it more human. (A ball for a brain, a ball for a stomach, that kind of thing)
If you like, add in herbs or objects for your intent, or keys to link the poppet with the person that you’re targeting. Consider positions of the objects and herbs inside the poppet and the significance. I added rose petals in the head and heart of this one, and mint and rosemary in the stomach. That gives it some symbolism, and what witch doesn’t enjoy symbolism?
-Step 6- When it is stuffed to satisfaction, sew up the opening with the same stitch we sewed with before flipping it. This leaves a rough edge, and I actually like it that way. It makes it easier to cut open the stitching if you ever wanted to for any reason. I can’t be the only person that’s wanted to rip someone’s stuffing out (there’s a curse idea) so I hope you find it useful too.
Do a couple more stitches to assure your thread isn’t going anywhere and then cut it off.
Ta-da! A perfect poppet for all of your witchcraft needs.
There are loads of people who aren’t able to take a ritual bath at all times. It can be because they are in the “witchy closet”, aren’t comfortable taking a bath, or basically doesn’t have a bathtub. So, I decided to share how I do when I’m in that situation. This is a very personal ritual, so it’s very open to adjustments if something else strikes your fancy more. Enjoy my friends!
What you’ll need:
A cloth
Coffee filters & elastics (so you don’t have herbs all over your cloth when you’re done showering)
Herbs of your choice (I’ve got cloves, lavender, pine needles, rosemary, aloe vera, cinnamon and bay leaves, but that’s up to you depending on what kind of shower you’re taking)
Salt
Safety pin (optional)
How to do:
1) You start by gathering your materials. Spread your cloth and place your herbs in the middle of it, in a tiny pile. Finish it off with a few pinches of salt on top of your pile (or keep it in a coffee filter as well if you’d like that).
2) Tie it together with the help of an elastic – or any other method if you prefer that instead!
3) Step into the shower. Ask your herbs to cleanse/protect you/wash of anxiety – again, depending on what shower you’re having.
4) Start the shower and wet the herbs in the cloth. Wash yourself with the herb cloth, starting from your head down to your feet, every single inch you can reach. Visualize the negativity/anxiety peeling off your skin like dead cells and going the drain, alternatively creating a shield-like surface on your skin to protect you (make sure you have specified what you want protection from!!).
5) When you’ve reached the soles of your feet and you feel done, tie the cloth onto your shower head with the help of the safety pin and stay under the spray for a bit. This is usually the part where I shampoo and stuff if I want to, but that’s 100% up to you.
6) When you’re done showering, open the cloth again and hang it to dry. Thank your herbs for helping you, and dispose of in a respectful way.
REMINDER: Before you even gather your herbs, RESEARCH them. And then do it again. And again. Make sure you’re not using herbs that can bring you harm in any way. Never ingest ANY herb without researching them. And then do it again. And then again. Thank you.
Blue – Sadness, anxiety, depression, loss, mourning, grief, loss of money and valuables, distance, emptiness
Light Blue – Anxiety, detached, cold, loss of control, slipping, time manipulation (cause lateness or earliness), vague, cloud judgement, obscure visions, dream manipulation
Dark Blue – Nightmares, dream manipulation, fear, terror, darkness, manipulation
Purple – Nightmares, anxiety, dreams and visions altered/tainted, material obsession, confusion, constant change, manipulate variables, influence
Lavender – Lack of ambition, distraction, confusion, lack of motivation, easily distracted, restless, dissociation, indecisive
Green – Stubborn, forceful, rash, obstacles, getting nothing from work, blocking, inability to reach milestones, halt, stop
Orange – Expenses, not enough money, blocking flow, material obsession, yearning and getting nothing, distractions
Yellow – Siphon money/fortune/good from them, leech from them, lack of energy, lack of control, constant annoyanes
Note: Adding salt to certain herbs or small spells (such as bay and/or basil mixed with lemon for money) can siphon that thing to you from them for a simple small hex.
Whatever you do with information is on you. Do with it what you wish.
Nova Note: Reading though this, I noticed something missing.
If you are handling anything toxic/posionous/venomous/etc, use EXTREME caution and care. Educate yourself on the best way to use, store, and dispose of those kinds of ingredients. Know how to protect yourself.
A little while ago, I realized that there is NO info on what bones to use for what. I was clueless and had no idea where to begin. Research was fruitless and asking others came with no results.
So I sat down during preap algebra 2 and made my own list.
These are my own correspondences, based off of what I felt like and remembering bits of spells I’d thought about. They are 100% my own, taken from no one.
Please give me credit if you use it anywhere else 🙂
I also know I haven’t included every bone out there, if I missed one msg me, I’ll give it some thought and see what happens! 😀
▪Teeth- communication, learning other language, news, defense
▪Skull- thoughts, divination, communication, spirit work, astral
▪Spine- support, confidence, level headed
▪Arm- help, blocking (curses, hexes, psychic attacks, etc)
▪Wrist- flexibility, hard work
▪Hand- art, artistic ability, creativity, energy
▪Fingers- fluidity, progress, endurance
▪Nails/ claws- fighting, protection, finding things out, knowledge, struggle, balance
▪Rib- agility, protection
▪Hip- ebdurance, keeping it together
▪leg- endurance, travel, strength
▪Ankle- movement, moving on, catalyst
▪Foot- endurance, moving on, leaving things behind, hard work, independence, luck
▪Toe- balance, help, prosperity, money, changing luck (for the better or worse)
▪Tail- (like actual bones in the animals tail, not the tailbone) agility, secrecy, alarm, cursing
(Edited to include:)
▪Antlers- strength, endurance, masculine energy, (if you’re Wiccan, the horned God), protection, more centered toward nature and earth, deflecting curses, and hope.
▪Horns- wealth, the home, determination, aggressive protection, more centered toward that which is man made, and cursing
(Second edit)
▪Wings- adventure, deviating from the norm, sending/ receiving messages, travel, starting a new adventure/ path, hope, luck, wishes, comfort (let it be amplifying or taking away)
The type of bird would also affect the correspondences; the wing bones, to me, would increase the things the bird stands for