Here’s an exercise! I cannot draw cars well. I don’t like drawing cars.
The first sketch was from memory without looking at any photos of a car. The second was traced from a photo of a car. The third, without looking at any photos or previous sketches. I still can’t draw cars very well but a bit more about what they look like are embedded in my memory. :>
Tracing is a wonderful way to practice. This works for more than just machines, if you trace something then it helps you learn how it FEELS to draw something accurately, which gives you the freedom to experiment, exaggerate, and stylize your art without sacrificing structure and recognizeability.
I get a lot of compliments on the way I draw muscular people. If I had not gone through a phase of tracing models then I would not have learned how it FEELS to draw proportional muscles. It greatly improved my art in the long term, and now when I use reference photos I find that it’s easier for me to make sense of what I’m looking at.
In her book, Writing Faster FTW, author L.A. Witt shares several techniques that have helped her write several books a year at impeccable speed. I’m a huge fan of fast drafting and picked this book up hoping to learn some useful tips and tricks to improve my writing speed. One of Witt’s favorite techniques involves the use of brackets. If, while writing, you get to a point where you don’t know what to put for a character’s name, eye color, or dialogue, toss in some brackets! Then, once you’re finished with the draft, you can search for the brackets and beef up the manuscript as needed.
While working on the first draft of my novel Reflections, I’ve been using a lot of brackets. Most of the time, at the end of the day’s writing session, I’ll go back and replace the brackets with relevant information. But when it seems that more in-depth revision will be needed, I leave the brackets until it’s time to do my second draft. For a glimpse of what this technique looks like in action, see the excerpt below:
With her father out of the room, the restaurant felt [adjective], cold, and unsettling. The television, which had gone to a commercial break and was blaring [description of ads], was far too loud for human ears. Rama’s hands trembled as she picked up the remote again and turned the whole thing off. She [phrase about safety even though it meant she had to face her [adjective] thoughts without any distractions.
HELLO! HMMM I guess a way to go about it could be to think about having an action and reaction?
THese are some things i like to keep in mind when drawing characters together!! I personally rly like little details like placing hands in a specific spot/ fingers in hair/ pulling on clothes etc HAHA ALSO I like doing quick doodles from shows/films to see how characters interact with each other, so maybe u could try doing that!! I HOPE THIS HELPS YOU OUT A LITTLE!
One of the thriftiest, most versatile ways to garden is what’s called Straw Bale gardening. Often cheaper than garden soil or fertilizer, straw bales are found virtually everywhere. Craigslist, home depot or other home improvement stores will sell them for pennies on the dime when push comes to shove.
But what can you grow?
The answer: just about anything.
Moisture and heat collect in the straw bale like a trap. Tomatoes, corn and other tall plants can break the bale apart the taller they get, but potatoes and herbs will thrive in your bale.
Hay bales start to decompose just hours after they get wet and can provide an atmosphere better than your greenhouse. By digging a hole into your bale, dropping in some soil around your plants and packing it firmly, you’ll add some stability to your plant and as your bale decomposes, it will provide a steady source of nutrition all throughout the growing season.
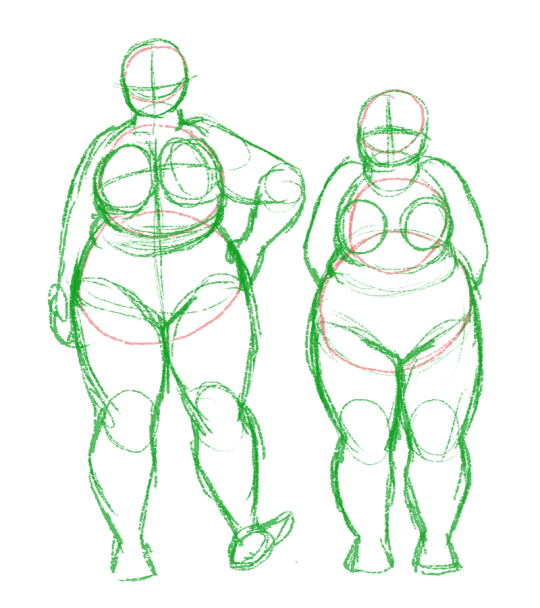
ok i’m no expert and to be quite honest i don’t even know what i’m doing most of the time BUT i’ll give u some tips based on how i draw + what i know from being a chubby person myself lol
first of all: think circles
snowmen!!! the first one’s body is made up of 2 circles of the same size, indicating the chest and hips are gonna be the about the same size (an hourglass shape), while the one on the right has a smaller top and is gonna be a pear shape!!
now let’s sketch over these snowmen, keeping circles and soft shapes in mind the whole time!
and finally….
note the tummy rolls where the circles overlap!! fat will squish and bend all over the place, so if a person is stretching there won’t be tummy rolls, but when relaxing, the fat will roll up.
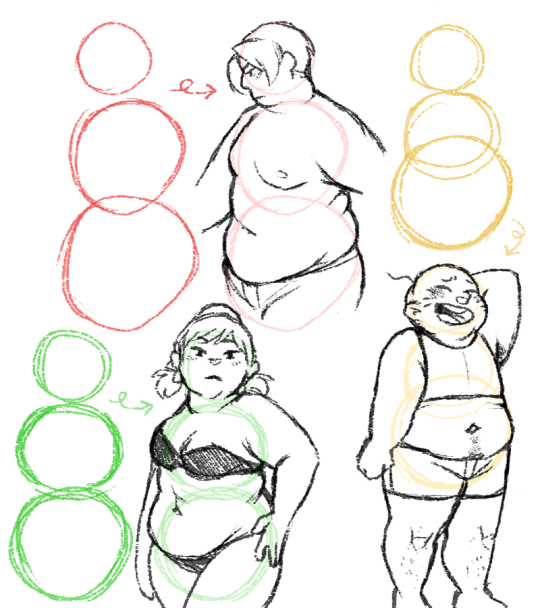
important to keep in mind: fat distribution varies a lot from person to person!! i reccommend googling nude fat people (not just plus models!!!) and studying how the fat is stored on people’s bodies and how it will move with the person!! (and if you happen to be a chubby person yourself, don’t be afraid to use a mirror!!)
fat people come in all shapes and sizes, so i couldn’t even BEGIN to try and draw every body shape there is!! so again, google is your friend. that said, here’s a few more snowmen turning into people:
the body isn’t the only thing to keep in mind, of course; the face is also super important!! a nice trick is to simply put less definition on the jawline; fat covers up bone structure!!
i just erased some lines and BOOM!! also, make the face rounder and fuller for those cute pinchable chubby cheeks!!
and of course, don’t forget about double chins!!
a lot of fat is stored around the neck so not only will you get double chins, but the back of the neck will also be chubby!! that’s a good thing to keep in mind when drawing short-haired or bald chubby people
another important detail: the arms!
fat mostly tends to gather in the upper arms but depending on the person the rest of the arm can also be noticeably chubby (for example, there will be less bone definiton around the wrist.) take note of the armpit area, where you’ll get folds!!
now for something i think is super important!!! stretchmarks!!
honestly, i think it’s so sad that there’s so much stigma around stretchmarks, because i think they’re wonderful!! they look like lightning bolts, or tiger stripes!!!
that said, stretchmarks are scars, so fresh marks will be reddish while older marks will fade and usually become a lighter tone than your skintone. they’ll appear wherever the skin stretches when you grow or gain weight, but here are the most common places to see them:
the upper arms
the chest/breasts
the underside of the tummy
the waist
the thighs (both inside and outside)
the butt
ok, i think that’s about it for tips i have to offer!! i’ll just repeat the most important tip of them all: don’t be afraid to google references!! references are your friend, it’s not cheating, every artist uses them and you will learn SO MUCH from them, trust me!!! and of course, practice practice PRACTICE!! figuring out how to draw different body types in your own style, especially if you’re used to drawing slimmer/skinnier people (and let’s face it, a lot of us started out drawing just one body type) takes time and practice, so just keep drawing!! 😀
hello i am here today to not lose track of the art cheats i have discovered over the years. what i call art cheat is actually a cool filter/coloring style/way to shade/etc. that singlehandedly makes art like 20 times better
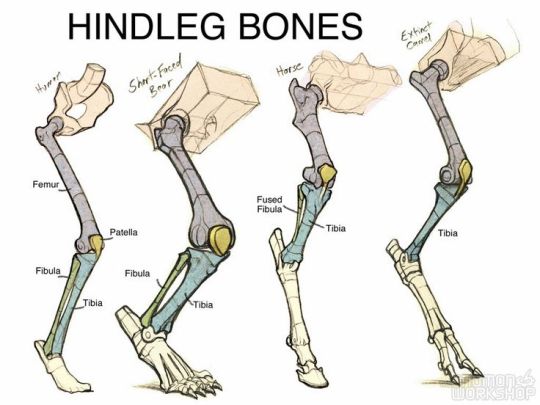
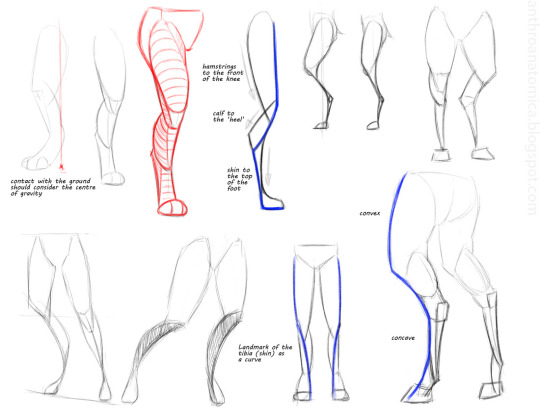
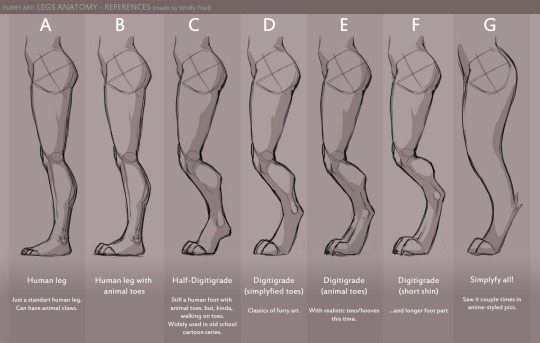
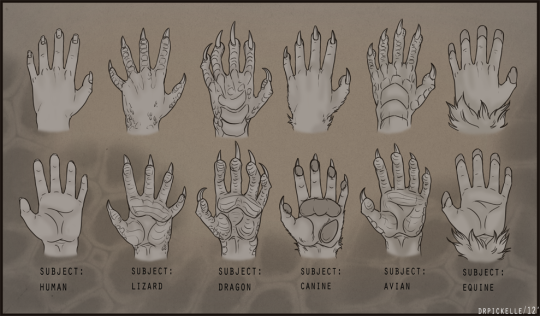
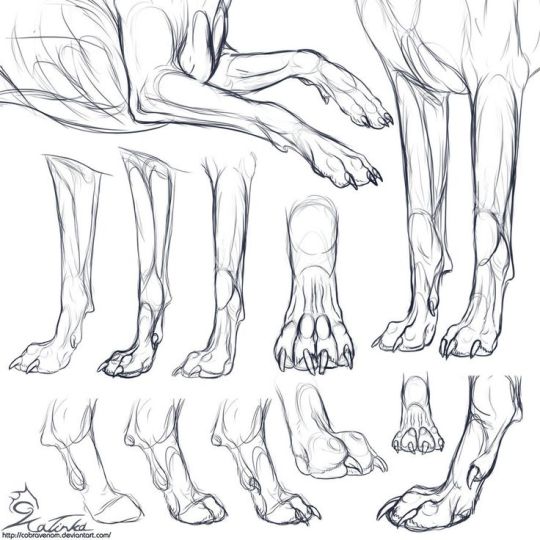
Finally revamped my ol’ realistic canine leg tutorial! The original is HERE
*PLEASE NOTE – this is a realistic, wild canine tutorial. Meaning if you prefer stylized anatomy feel free to ignore this tutorial. Also some of the do’s and don’ts here differ from domesticated canine anatomy.